Key Takeaways
- FHIR is a medical data exchange standard, and AWS HealthLake is an AWS-managed service that provides FHIR server capabilities;
- SMART-on-FHIR is an OAuth2 implementation that provides standardized access to medical data;
- HealthLake is encrypted by default using AWS-managed keys, though you can provide your own customer-managed keys;
- The data can be exported to AWS S3;
- HealthLake can utilize Cognito and AWS Lambda to provide SMART-on-FHIR capabilities.
Is Your HealthTech Product Built for Success in Digital Health?
.avif)
Last updated: November 2025
Healthcare applications need authentication to protect sensitive patient data. This is a clear fact, but putting authentication into practice can be challenging.
As FHIR expert Darren Devitt wrote in his post about 10 hard truths you won’t learn in the FHIR documentation:
You will almost certainly have to build a proxy in front of your FHIR server.
It’s a common use case that your proxy or backend must authorize with a lot of FHIR servers for data exchange and interoperability purposes. Having a common protocol simplifies it significantly.
This is where SMART-on-FHIR comes in — a standardized approach for healthcare applications to authenticate and access patient data securely. By implementing this with AWS HealthLake, we can create applications that comply with healthcare standards while leveraging AWS services working alongside HealthLake.
SMART-on-FHIR represents a streamlined OAuth 2.0 implementation that sits on top of the FHIR server.
When choosing a FHIR server provider, it’s important to remember that implementations vary significantly between major cloud providers and open-source alternatives. Before making your selection, carefully evaluate whether specific features you need, such as FHIR subscriptions or SMART-on-FHIR, are supported by your chosen provider.
HealthLake offers a comprehensive suite of services, including machine learning integration, data export capabilities to S3, and default encryption with both AWS-managed and customer-provided keys, as well as REST API functionality and numerous other features. For a more detailed understanding, I strongly recommend reviewing the documentation, which, although lengthy, provides extensive guides and implementation details.
{{lead-magnet}}
Scheme
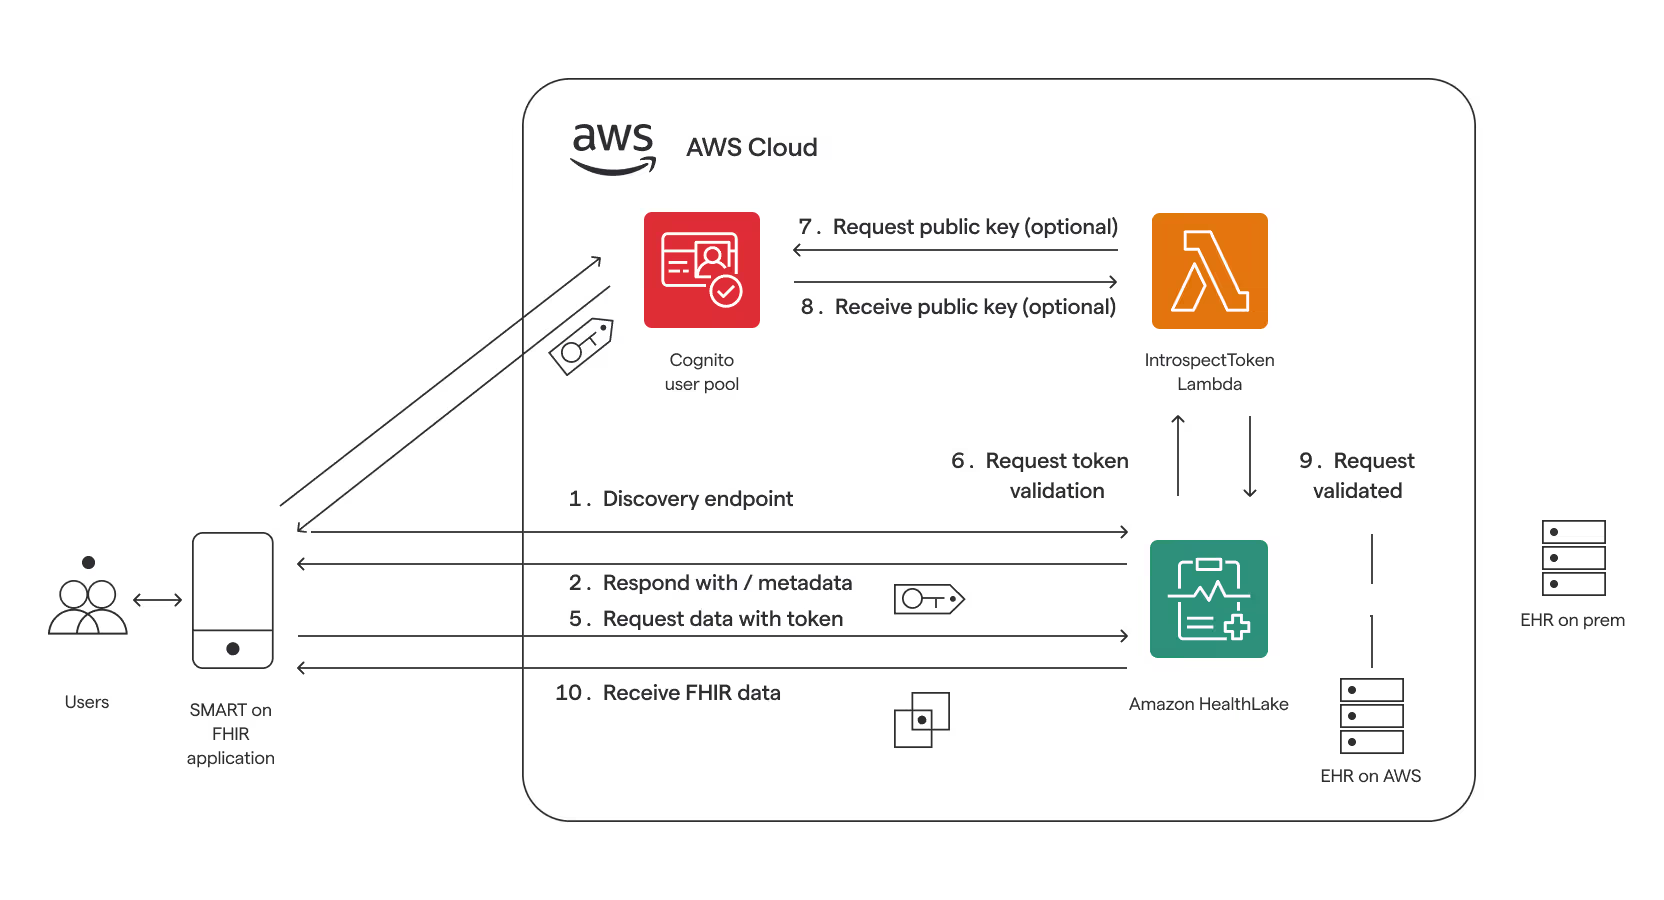
This diagram illustrates the workflow of a SMART-on-FHIR application interfacing with Amazon HealthLake.
The sequence follows these steps:
- The application initiates communication through a discovery endpoint (1)
- It receives metadata in response (2)
- The application requests and obtains an authentication token from the Cognito user pool (3,4)
- Using the received token, it submits a data request (5)
The token validation process includes:
- Submission of request to HealthLake (5)
- HealthLake initiates validation through Lambda (6)
- Optional public key exchange with Cognito (7,8)
- Lambda returns the validation outcome (9)
- Upon successful validation, HealthLake transmits FHIR data to the application (10)
The AWS infrastructure is compatible with both on-premises and AWS-hosted Electronic Health Record (EHR) systems.
If you prefer to skip the complete tutorial and use the modularized solution instead, you can find it in the HealthStack repository.
Prerequisites
- Terraform installed on your system (version 1.9 was used for this tutorial)
- AWS admin access credentials (access key and secret key) configured for authentication
Chapter 1: HealthLake
AWS HealthLake is a HIPAA-eligible service that provides a fully managed FHIR server. It stores medical data in NDJSON format and offers a REST API for interacting with health data. While its API handles basic queries, complex analysis requires exporting data to S3 and using tools like Athena or Amazon Comprehend Medical.
First step is to create an AWS HealthLake datastore (awscc_healthlake_fhir_datastore) using Terraform with basic configuration:
resource "awscc_healthlake_fhir_datastore" "this" {
  datastore_name         = "my-fhir-datastore"
  datastore_type_version = "R4"
  preload_data_config = {
    preload_data_type = "SYNTHEA"
  }

  sse_configuration = {
    kms_encryption_config = {
      cmk_type   = "AWS_OWNED_KMS_KEY"
      kms_key_id = null
    }
}Notice it uses the awscc provider, not the regular aws one.
It provides us with basic HealthLake configuration with AWS managed key encryption, supported R4 (the only one supported standard) and preloaded test data by SYNTHEA which provides quality healthcare data. You can also use AWS Customer managed keys and initialize without preloaded data.
To provide Customer-Managed keys you need to create a KMS resource with appropriate roles to manage it. Neither this nor the S3 configuration for exporting will be covered in the scope of this article but to do so you can use this HeathLake module.
Chapter 2: Cognito
AWS Cognito is a managed authentication service that handles user management and authentication for web and mobile applications. In this tutorial, it’s used to implement SMART-on-FHIR authentication, which is an OAuth2-based protocol specifically designed for healthcare applications. Cognito provides essential features like user pools for managing user directories, resource servers for defining access scopes, and client applications that can authenticate users — all crucial components for securing access to healthcare data through FHIR APIs.
An Amazon Cognito User Pool (aws_cognito_user_pool) is a secure user directory that manages authentication and authorization for web and mobile applications. It handles essential user management tasks like registration, sign-in, and access control.
## Cognito ##
resource "aws_cognito_user_pool" "main" {
  name                = "my-cognito-user-pool"
  deletion_protection = "INACTIVE" // or "ACTIVE"
  mfa_configuration   = "OFF"      // or "ON" / "OPTIONAL"

  alias_attributes         = ["email"]
  auto_verified_attributes = ["email"]

  account_recovery_setting {
    recovery_mechanism {
      name     = "verified_email"
      priority = 1
    }
  }

  admin_create_user_config {
    allow_admin_create_user_only = true
  }

  email_configuration {
    email_sending_account = "COGNITO_DEFAULT"
  }

  password_policy {
    minimum_length                   = 8
    require_lowercase                = true
    require_numbers                  = true
    require_symbols                  = true
    require_uppercase                = true
    temporary_password_validity_days = 7
  }

  schema {
    attribute_data_type      = "String"
    developer_only_attribute = false
    mutable                  = true
    name                     = "email"
    required                 = true

    string_attribute_constraints {
      max_length = "2048"
      min_length = "0"
    }
  }

  user_attribute_update_settings {
    attributes_require_verification_before_update = ["email"]
  }

  username_configuration {
    case_sensitive = false
  }

  verification_message_template {
    default_email_option = "CONFIRM_WITH_CODE"
  }
}
This Cognito User Pool configuration creates a user directory with email-based authentication, password requirements, email verification, and other general capabilities that can be adjusted.
Next we create Cognito User Pool Domain (aws_cognito_user_pool_domain) which provides a dedicated URL endpoint where users can sign in and manage their authentication.
resource "aws_cognito_user_pool_domain" "this" {
  domain       = "smart-fhir-test"
  user_pool_id = aws_cognito_user_pool.main.id
}
At this point, we have defined the user pool and its domain, which we will use to access authentication services.
Going further, we need to define resource servers. A Resource Server in OAuth 2.0 and Cognito is a server that hosts protected resources and handles requests using access tokens. It determines the available “scopes” which define specific permissions for accessing these resources.
resource "aws_cognito_resource_server" "launch" {
  identifier   = "launch"
  name         = "launch"
  user_pool_id = aws_cognito_user_pool.main.id

  scope {
    scope_name        = "patient"
    scope_description = "Request patient data"
  }
}

resource "aws_cognito_resource_server" "system" {
  identifier   = "system"
  name         = "system"
  user_pool_id = aws_cognito_user_pool.main.id

  scope {
    scope_name        = "*.*"
    scope_description = "Full system access"
  }
}

resource "aws_cognito_resource_server" "patient" {
  identifier   = "patient"
  name         = "patient"
  user_pool_id = aws_cognito_user_pool.main.id

  scope {
    scope_name        = "*.read"
    scope_description = "Read patient data"
  }
}
The next step is to define the client for your user pool.
A Cognito User Pool client (aws_cognito_user_pool_client) represents an application that needs to authenticate users through your Cognito User Pool. It acts as a registered application that can access the authentication services.
resource "aws_cognito_user_pool_client" "client" {
  name         = "my-cognito-client"
  user_pool_id = aws_cognito_user_pool.main.id

  generate_secret = true

  prevent_user_existence_errors        = "ENABLED"

  // ["code"] for auth code
  allowed_oauth_flows                  = ["client_credentials"]
  allowed_oauth_flows_user_pool_client = true

  // scopes for client credentials flow
  allowed_oauth_scopes = [
    "launch/patient",
    "system/*.*",
    "patient/*.read"
  ]

  // scopes for auth code flow
  // allowed_oauth_scopes = [
  //  "openid",
  //  "profile",
  //  "email",
  //  "phone",
  //  "launch/patient",
  //  "system/*.*",
  //  "patient/*.read"
  // ]

  callback_urls = ["https://localhost"]
  logout_urls   = []

  supported_identity_providers = ["COGNITO"]

  # token validity
  access_token_validity  = 60 // 1 hour
  id_token_validity      = 60 // 1 hour
  refresh_token_validity = 60 // 1 hour

  read_attributes = [
    "address", "birthdate", "email", "email_verified", "family_name",
    "gender", "given_name", "locale", "middle_name", "name", "nickname",
    "phone_number", "phone_number_verified", "picture", "preferred_username",
    "profile", "updated_at", "website", "zoneinfo"
  ]

  write_attributes = [
    "address", "birthdate", "email", "family_name", "gender", "given_name",
    "locale", "middle_name", "name", "nickname", "phone_number", "picture",
    "preferred_username", "profile", "updated_at", "website", "zoneinfo"
  ]

  token_validity_units {
    access_token  = "minutes"
    id_token      = "minutes"
    refresh_token = "minutes"
  }

  depends_on = [
    aws_cognito_resource_server.launch,
    aws_cognito_resource_server.system,
    aws_cognito_resource_server.patient
  ]
}
Note: The commented section allows you to define authentication code-based flow, but we’ll use client credentials in this tutorial.
For testing purposes, you can add a test user (aws_cognito_user) to your user domain.
resource "aws_cognito_user" "test_user" {
  user_pool_id = aws_cognito_user_pool.main.id
  username     = "test"
  password     = "Password1234!"

  attributes = {
    preferred_username = "testadmin"
    email              = "test@test.com"
    email_verified     = true
  }
}
Chapter 3: Lambda
AWS Lambda is one of the most popular services, and I assume most of you have encountered or heard about it. For those unfamiliar with it, AWS Lambda is a service that essentially runs code — specifically, a function. We need to validate credentials with Cognito and encode them in a JWT token that we will return to our service. AWS Lambda is perfectly suited for this task.
Now we’ll create a Lambda function to handle token generation and authentication using Python.
Here’s the project structure:
module
│───lambda
│   ├── package
│   │   ├── lambda_function.py
│   └── requirements.txt
└─── main.tf
Required dependencies in requirements.txt:
PyJWT==2.8.0
python-jose[cryptography]==3.3.0
urllib3>=2.0.7
Here’s a sample Python script we can use for authentication:
import base64
import logging
import json
import os
import urllib.request
from typing import Dict, Any
from datetime import datetime
import time
from jose import jwt
from jose.exceptions import JWTError

# configure logging
logger = logging.getLogger()
logger.setLevel(logging.INFO)

# get environment variables
CLIENT_ID = os.environ['CLIENT_ID']
CLIENT_SECRET = os.environ['CLIENT_SECRET']
JWKS_URI = os.environ['JWKS_URI']
USER_ROLE_ARN = os.environ['USER_ROLE_ARN']
USER_POOL_ID = os.environ['USER_POOL_ID']

class TokenValidationError(Exception):
    """Custom exception for token validation errors"""
    pass

def validate_token_claims(decoded_token: Dict[str, Any], datastore_endpoint: str) -> Dict[str, Any]:
    """
    Validate and format the required claims according to HealthLake's expected format:
    {
        "iss": "authorization-server-endpoint",
        "aud": "healthlake-datastore-endpoint",
        "iat": timestamp,
        "nbf": timestamp,
        "exp": timestamp,
        "isAuthorized": "true",
        "uid": "user-identifier",
        "scope": "system/*.*"
    }
    """
    current_time = int(time.time())

    # extract base claims
    mapped_token = {
        "iss": decoded_token.get('iss'),
        "aud": datastore_endpoint,  # Set to HealthLake datastore endpoint
        "iat": decoded_token.get('iat', current_time),
        "nbf": decoded_token.get('iat', current_time),  # Use iat if nbf not present
        "exp": decoded_token.get('exp'),
        "isAuthorized": "true",  # String "true" as per example
        "uid": decoded_token.get('sub', decoded_token.get('username', '')),  # Use sub or username as uid
        "scope": decoded_token.get('scope', '')
    }

    # validate required claims
    required_claims = ['aud', 'nbf', 'exp', 'scope']
    missing_claims = [claim for claim in required_claims if not mapped_token.get(claim)]
    if missing_claims:
        raise TokenValidationError(f"Missing required claims: {', '.join(missing_claims)}")

    # validate timestamps
    if current_time > mapped_token['exp']:
        raise TokenValidationError("Token has expired")
    if current_time < mapped_token['nbf']:
        raise TokenValidationError("Token is not yet valid")

    # validate scope format and presence
    scopes = mapped_token['scope'].split()
    if not scopes:
        raise TokenValidationError("Token has empty scope")

    # validate at least one FHIR resource scope exists
    valid_scope_prefixes = ('user/', 'system/', 'patient/', 'launch/')
    has_fhir_scope = any(
        scope.startswith(valid_scope_prefixes)
        for scope in scopes
    )
    if not has_fhir_scope:
        raise TokenValidationError("Token missing required FHIR resource scope")

    logger.info(f"Final mapped token: {json.dumps(mapped_token, default=str)}")
    return mapped_token

def decode_token(token: str) -> Dict[str, Any]:
    """Decode and validate the JWT token"""
    try:
        headers = jwt.get_unverified_headers(token)
        kid = headers.get('kid')
        if not kid:
            raise TokenValidationError("No 'kid' found in token headers")

        jwks = fetch_jwks()
        public_key = get_public_key(kid, jwks)

        decoded = jwt.decode(
            token,
            public_key,
            algorithms=['RS256'],
            options={
                'verify_exp': True,
                'verify_aud': False  # we handle audience validation separately
            }
        )

        logger.info(f"Token decoded successfully: {json.dumps(decoded, default=str)}")
        return decoded

    except JWTError as e:
        logger.error(f"JWT validation error: {str(e)}")
        raise TokenValidationError(f"Token validation failed: {str(e)}")
    except Exception as e:
        logger.error(f"Token decoding error: {str(e)}")
        raise TokenValidationError(f"Token decoding failed: {str(e)}")

def fetch_jwks() -> Dict[str, Any]:
    """Fetch the JWKS from the authorization server"""
    try:
        with urllib.request.urlopen(JWKS_URI) as response:
            return json.loads(response.read().decode('utf-8'))
    except Exception as e:
        logger.error(f"Error fetching JWKS: {str(e)}")
        raise TokenValidationError(f"Failed to fetch JWKS: {str(e)}")

def get_public_key(kid: str, jwks: Dict[str, Any]) -> str:
    """Get the public key matching the key ID from JWKS"""
    for key in jwks.get('keys', []):
        if key.get('kid') == kid:
            return json.dumps(key)
    raise TokenValidationError(f"No matching key found for kid: {kid}")

def lambda_handler(event: Dict[str, Any], context: Any) -> Dict[str, Any]:
    """
    Lambda handler for SMART on FHIR token validation
    Expected output format:
    {
        "authPayload": {
            "iss": "https://authorization-server-endpoint/oauth2/token",
            "aud": "https://healthlake.region.amazonaws.com/datastore/id/r4/",
            "iat": 1677115637,
            "nbf": 1677115637,
            "exp": 1997877061,
            "isAuthorized": "true",
            "uid": "100101",
            "scope": "system/*.*"
        },
        "iamRoleARN": "iam-role-arn"
    }
    """
    try:
        # validate input
        required_fields = ['datastoreEndpoint', 'operationName', 'bearerToken']
        if not all(field in event for field in required_fields):
            raise ValueError(f"Missing required fields: {', '.join(required_fields)}")

        logger.info(f"Processing request for endpoint: {event['datastoreEndpoint']}, "
                   f"operation: {event['operationName']}")

        # extract token from bearer string
        bearer_token = event['bearerToken']
        token = bearer_token[7:] if bearer_token.startswith('Bearer ') else bearer_token

        # decode and validate token
        decoded_token = decode_token(token)

        # format claims to match expected output
        auth_payload = validate_token_claims(decoded_token, event['datastoreEndpoint'])

        return {
            'authPayload': auth_payload,
            'iamRoleARN': USER_ROLE_ARN
        }

    except TokenValidationError as e:
        logger.error(f"Token validation error: {str(e)}")
        return {
            'authPayload': {
                'isAuthorized': "false",
                'error': str(e)
            }
        }
    except Exception as e:
        logger.error(f"Unexpected error: {str(e)}")
        return {
            'authPayload': {
                'isAuthorized': "false",
                'error': f"Internal error: {str(e)}"
            }
        }
To deploy the lambda function, we need to install additional packages and prepare a package directory for zipping and uploading. Use these commands:
python3.11 -m venv venv
source venv/bin/activate

pip3 install \
--platform manylinux2014_x86_64 \
--target=package \
--implementation cp \
--python-version 3.11 \
--only-binary=:all: --upgrade -r requirements.txt
Next, we’ll configure Lambda by defining the zip process, function settings, and required roles and privileges.
## Lambda ##
data "aws_region" "current" {}
data "aws_caller_identity" "current" {}

data "archive_file" "lambda_zip" {
  type        = "zip"
  source_dir  = "lambda/package"
  output_path = "lambda/lambda_function.zip"
  excludes    = ["__pycache__", "*.pyc", "*.dist-info"]
}

resource "aws_lambda_function" "token_validator" {
  filename         = data.archive_file.lambda_zip.output_path
  function_name    = "smart-fhir-auth-lambda"
  role             = aws_iam_role.lambda_role.arn
  handler          = "lambda_function.lambda_handler"
  source_code_hash = filebase64sha256(data.archive_file.lambda_zip.output_path)
  runtime          = "python3.11"
  timeout          = 30
  memory_size      = 128
  architectures    = ["x86_64"]

  environment {
    variables = {
      CLIENT_ID     = aws_cognito_user_pool_client.client.id
      CLIENT_SECRET = aws_cognito_user_pool_client.client.client_secret
      JWKS_URI      = "https://cognito-idp.${data.aws_region.current.name}.amazonaws.com/${aws_cognito_user_pool.main.id}/.well-known/jwks.json"
      USER_ROLE_ARN = aws_iam_role.healthlake_service_role.arn
      USER_POOL_ID  = aws_cognito_user_pool.main.id
    }
  }
}

resource "aws_iam_role" "healthlake_service_role" {
  name        = "my-healthlake-service-role"
  description = "Service role for AWS HealthLake FHIR operations"

  assume_role_policy = jsonencode({
    Version = "2012-10-17"
    Statement = [
      {
        Effect = "Allow"
        Principal = {
          Service = "healthlake.amazonaws.com"
        }
        Action = "sts:AssumeRole"
      }
    ]
  })
}

resource "aws_iam_role_policy_attachment" "healthlake_policy" {
  role       = aws_iam_role.healthlake_service_role.name
  policy_arn = "arn:aws:iam::aws:policy/AmazonHealthLakeFullAccess"
}

resource "aws_iam_role" "lambda_role" {
  name = "smart-fhir-auth-lambda-role"

  assume_role_policy = jsonencode({
    Version = "2012-10-17"
    Statement = [
      {
        Action = "sts:AssumeRole"
        Effect = "Allow"
        Principal = {
          Service = "lambda.amazonaws.com"
        }
      }
    ]
  })
}

resource "aws_iam_role_policy_attachment" "lambda_basic" {
  policy_arn = "arn:aws:iam::aws:policy/service-role/AWSLambdaBasicExecutionRole"
  role       = aws_iam_role.lambda_role.name
}

resource "aws_iam_role_policy" "cognito_access" {
  name = "smart-fhir-auth-lambda-cognito-access"
  role = aws_iam_role.lambda_role.id

  policy = jsonencode({
    Version = "2012-10-17"
    Statement = [
      {
        Effect = "Allow"
        Action = [
          "cognito-idp:GetUser"
        ]
        Resource = "*"
      }
    ]
  })
}

resource "aws_lambda_permission" "healthlake" {
  statement_id  = "healthlake"
  action        = "lambda:InvokeFunction"
  function_name = aws_lambda_function.token_validator.function_name
  principal     = "healthlake.amazonaws.com"
}
Chapter 4: Update HealthLake resource
Update you first resource with provided identity config:
## HealthLake ##
resource "awscc_healthlake_fhir_datastore" "this" {
  datastore_name         = "my-fhir-datastore"
  datastore_type_version = "R4"
  preload_data_config = {
    preload_data_type = "SYNTHEA"
  }

  identity_provider_configuration = {
    authorization_strategy             = "SMART_ON_FHIR_V1"
    fine_grained_authorization_enabled = true
    idp_lambda_arn                     = aws_lambda_function.token_validator.arn
    metadata = jsonencode({
      issuer                 = "https://${aws_cognito_user_pool_domain.this.domain}.auth.${data.aws_region.current.name}.amazoncognito.com"
      authorization_endpoint = "https://${aws_cognito_user_pool_domain.this.domain}.auth.${data.aws_region.current.name}.amazoncognito.com/oauth2/authorize"
      token_endpoint         = "https://${aws_cognito_user_pool_domain.this.domain}.auth.${data.aws_region.current.name}.amazoncognito.com/oauth2/token"
      jwks_uri               = "https://cognito-idp.${data.aws_region.current.name}.amazonaws.com/${aws_cognito_user_pool.main.id}/.well-known/jwks.json"

      response_types_supported = ["code", "token"]
      response_modes_supported = ["query", "fragment", "form_post"]

      grant_types_supported = [
        "authorization_code",
        "implicit",
        "refresh_token",
        "password",
        "client_credentials"
      ]

      subject_types_supported = ["public"]

      scopes_supported = [
        "openid",
        "profile",
        "email",
        "phone",
        "launch/patient",
        "system/*.*",
        "patient/*.read"
      ]

      token_endpoint_auth_methods_supported = [
        "client_secret_basic",
        "client_secret_post"
      ]

      claims_supported = [
        "ver",
        "jti",
        "iss",
        "aud",
        "iat",
        "exp",
        "cid",
        "uid",
        "scp",
        "sub"
      ]

      code_challenge_methods_supported = ["S256"]

      registration_endpoint  = "https://${aws_cognito_user_pool_domain.this.domain}.auth.${data.aws_region.current.name}.amazoncognito.com/oauth2/register"
      management_endpoint    = "https://${aws_cognito_user_pool_domain.this.domain}.auth.${data.aws_region.current.name}.amazoncognito.com/oauth2/userInfo"
      introspection_endpoint = "https://${aws_cognito_user_pool_domain.this.domain}.auth.${data.aws_region.current.name}.amazoncognito.com/oauth2/introspect"
      revocation_endpoint    = "https://${aws_cognito_user_pool_domain.this.domain}.auth.${data.aws_region.current.name}.amazoncognito.com/oauth2/revoke"

      revocation_endpoint_auth_methods_supported = [
        "client_secret_basic",
        "client_secret_post",
        "client_secret_jwt",
        "private_key_jwt",
        "none"
      ]

      request_parameter_supported = true

      request_object_signing_alg_values_supported = [
        "HS256",
        "HS384",
        "HS512",
        "RS256",
        "RS384",
        "RS512",
        "ES256",
        "ES384",
        "ES512"
      ]

      capabilities = [
        "launch-ehr",
        "sso-openid-connect",
        "client-public"
      ]
    })
  }

  sse_configuration = {
    kms_encryption_config = {
      cmk_type   = "AWS_OWNED_KMS_KEY"
      kms_key_id = null
    }
  }

  lifecycle {
    ignore_changes = [identity_provider_configuration]
  }
}
Chapter 5: Deployment
To make the Terraform configuration more useful, add these outputs:
output "cognito_scopes" {
  description = "Cognito scopes"
  value = {
    launch  = aws_cognito_resource_server.launch.id
    system  = aws_cognito_resource_server.system.id
    patient = aws_cognito_resource_server.patient.id
  }
}

output "cognito_oauth_endpoints" {
  description = "OAuth endpoints for Cognito"
  value = {
    authorization = "https://${aws_cognito_user_pool_domain.this.domain}.auth.${data.aws_region.current.name}.amazoncognito.com/oauth2/authorize"
    token         = "https://${aws_cognito_user_pool_domain.this.domain}.auth.${data.aws_region.current.name}.amazoncognito.com/oauth2/token"
    userinfo      = "https://${aws_cognito_user_pool_domain.this.domain}.auth.${data.aws_region.current.name}.amazoncognito.com/oauth2/userInfo"
    jwks          = "https://cognito-idp.${data.aws_region.current.name}.amazonaws.com/${aws_cognito_user_pool.main.id}/.well-known/jwks.json"
  }
}

output "cognito_domain" {
  description = "Cognito domain"
  value       = "https://${aws_cognito_user_pool_domain.this.domain}.auth.${data.aws_region.current.name}.amazoncognito.com"
}

output "cognito_client_credentials" {
  description = "Cognito Client credentials"
  value = {
    client_id     = aws_cognito_user_pool_client.client.id
    client_secret = aws_cognito_user_pool_client.client.client_secret
  }
  sensitive = true
}
output "datastore_endpoint" {
  value = awscc_healthlake_fhir_datastore.this.datastore_endpoint
}

output "datastore_arn" {
  value = awscc_healthlake_fhir_datastore.this.datastore_arn
}
Follow these steps to ensure your Terraform configuration is properly formatted and validated:
terraform fmt      # format configuration files
terraform init     # download and set up providers
terraform validate # check if configuration is correct
It’s time to deploy our infrastructure by running:
terraform applyAs I mentioned it will take a while, in my case it was 28 minutes. So you can take a break and have a cup of coffee.
This is a log from my deployment:
awscc_healthlake_fhir_datastore.this: Creation complete after 28m24sYou should see something like this in outputs:
Outputs:

cognito_client_credentials = <sensitive>
cognito_domain = "https://smart-fhir-test.auth.us-east-1.amazoncognito.com"
cognito_oauth_endpoints = {
  "authorization" = "https://smart-fhir-test.auth.us-east-1.amazoncognito.com/oauth2/authorize"
  "jwks" = "https://cognito-idp.us-east-1.amazonaws.com/us-east-1_oP3ig4SGy/.well-known/jwks.json"
  "token" = "https://smart-fhir-test.auth.us-east-1.amazoncognito.com/oauth2/token"
  "userinfo" = "https://smart-fhir-test.auth.us-east-1.amazoncognito.com/oauth2/userInfo"
}
cognito_scopes = {
  "launch" = "us-east-1_oP3ig4SGy|launch"
  "patient" = "us-east-1_oP3ig4SGy|patient"
  "system" = "us-east-1_oP3ig4SGy|system"
}
datastore_arn = "arn:aws:healthlake:us-east-1:9...3:datastore/fhir/9c3...6b6"
datastore_endpoint = "https://healthlake.us-east-1.amazonaws.com/datastore/9c3...6b6/r4/"
Note datastore_endpoint and cognito_oauth_endpoints.token. You will also need cognito_client_credentials, but as it is sensitive variable you have to:
terraform output -json cognito_client_credentials #=>
{"client_id":"401...st9","client_secret":"1j3...2nf"}
Chapter 6: Testing
Postman
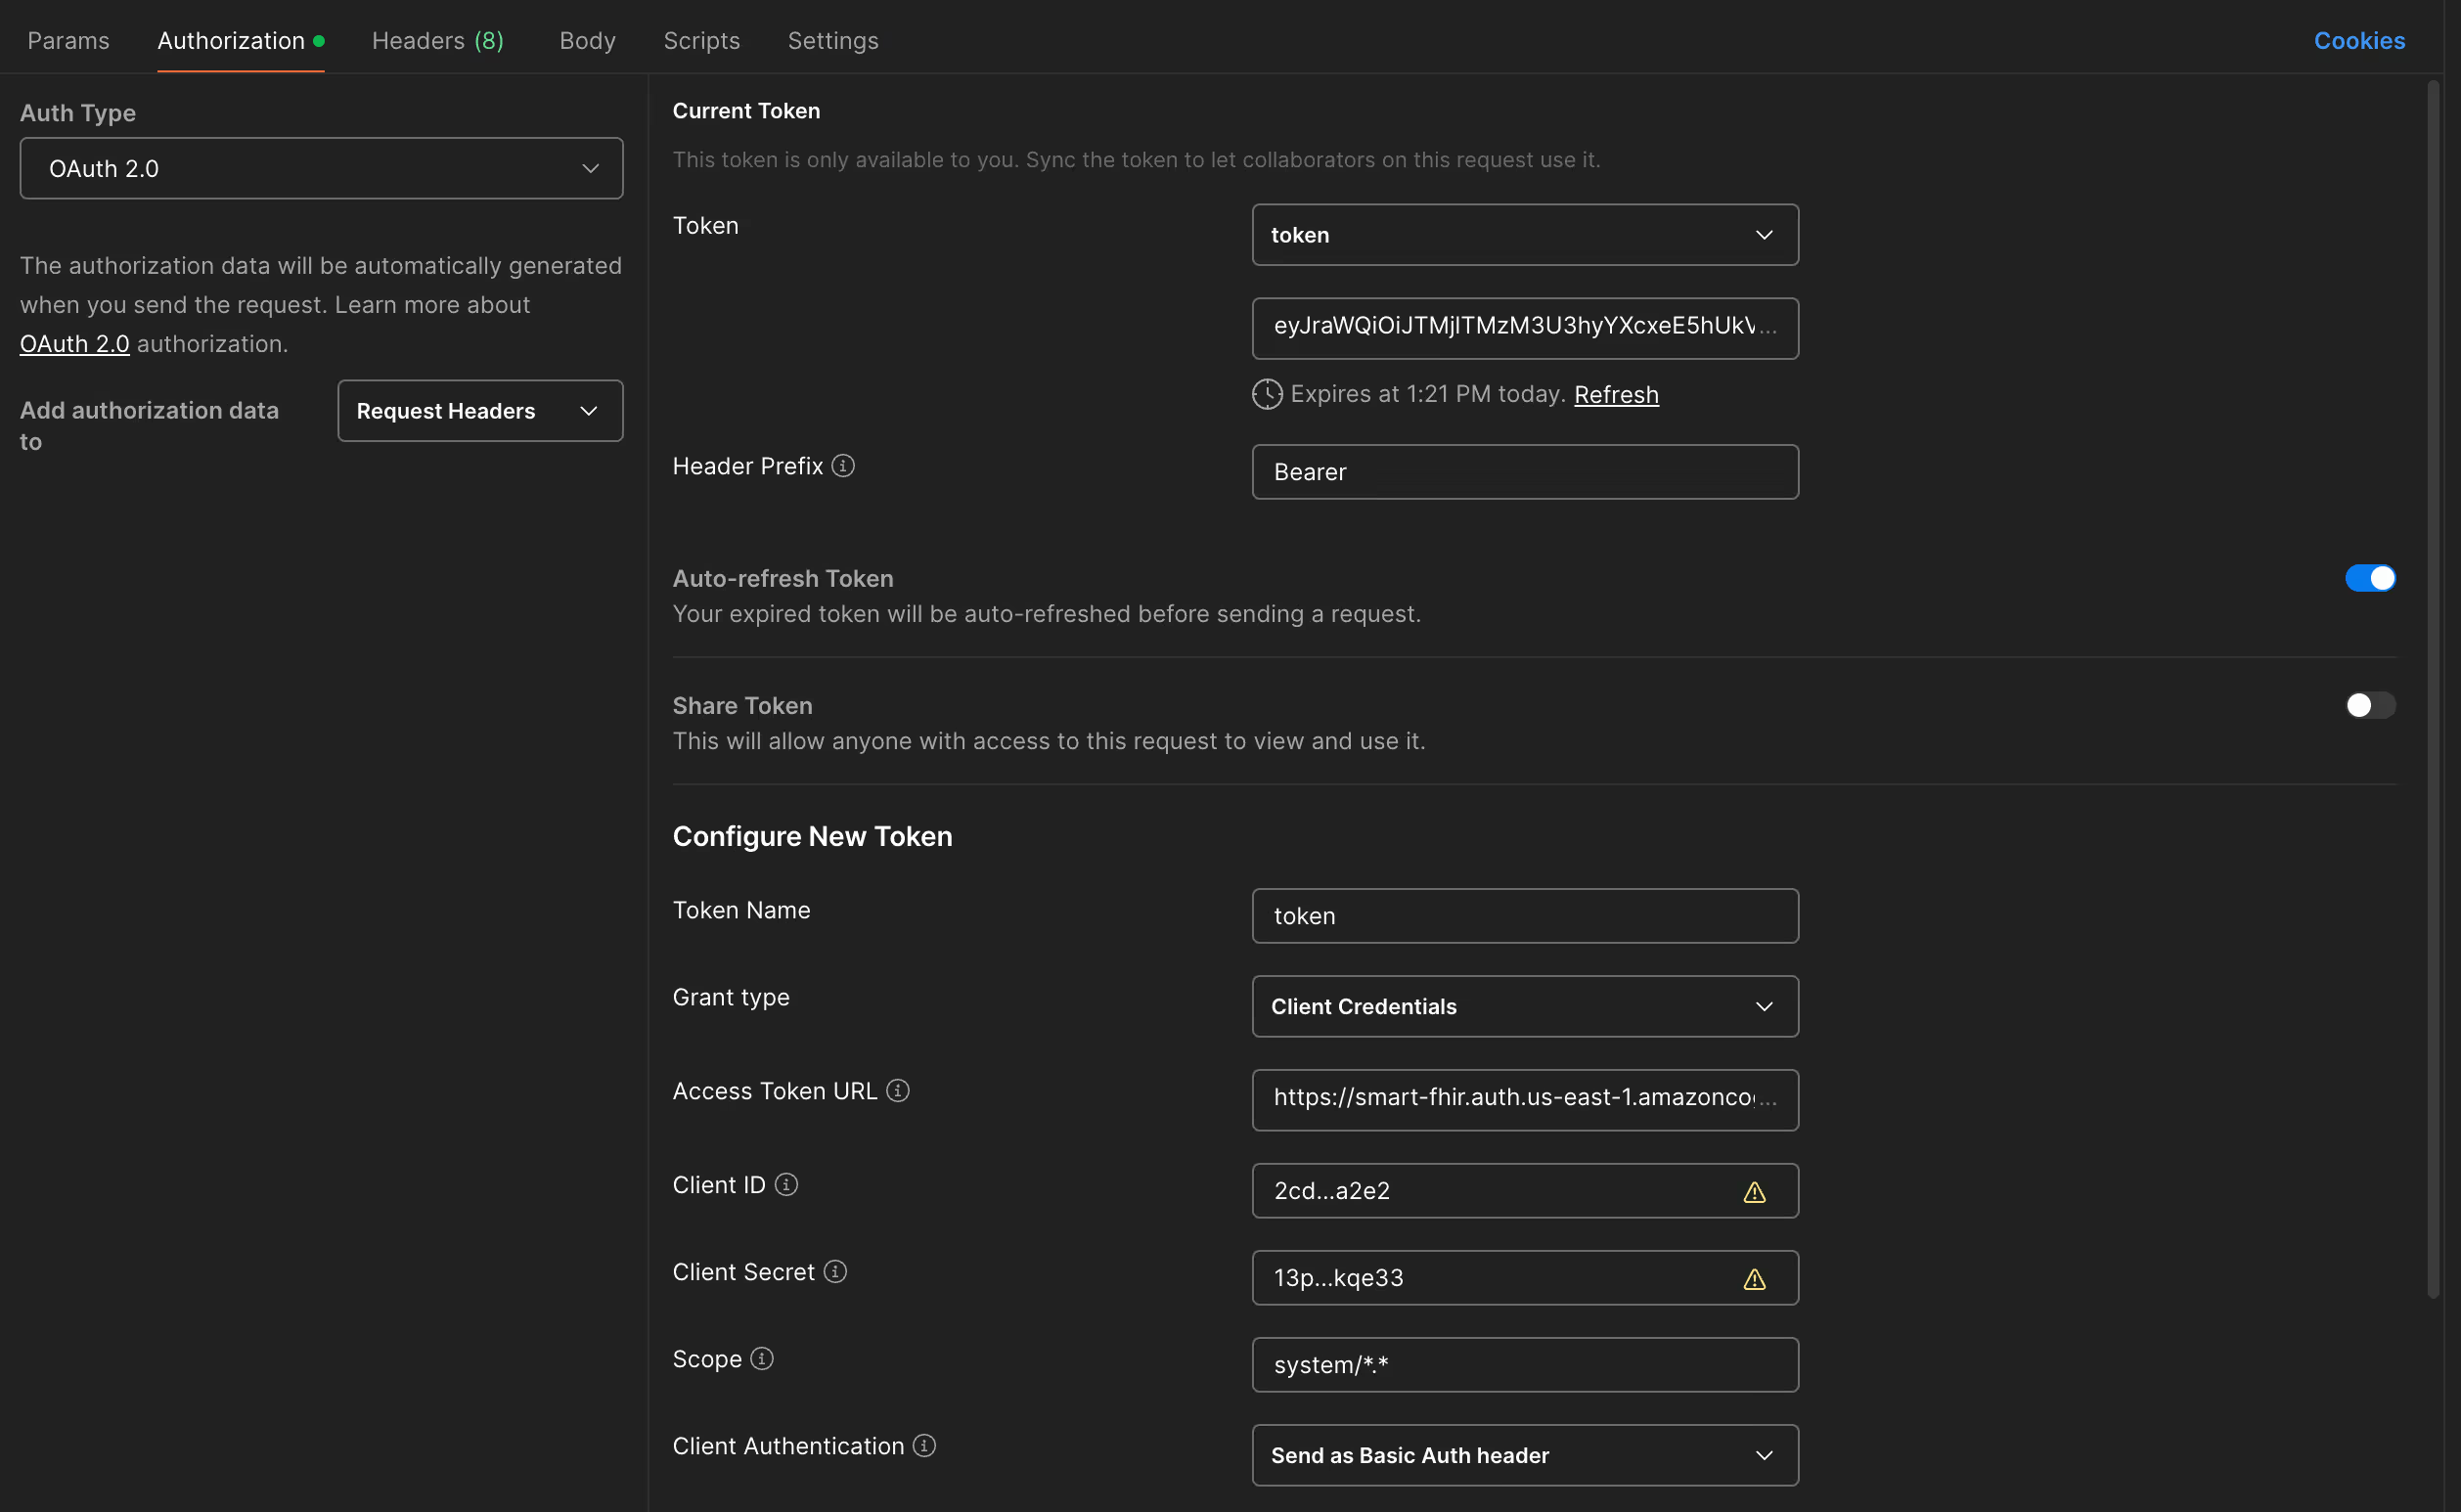
If you want to test SMART, you can use Postman to do soo. (have a look at screens below)
Here is what you need to do:
- Open Postman and check “Authorization” tab (under URL placeholder)
- Choose OAuth 2.0 in Auth Type
- Scroll down and under “Configure New Token” fill credentials:
- Token Name — ex. “test-token”
- Grant Type — Client Credentials
- Access Token URL — ex.https://smart-fhir-test.auth.us-east-1.amazoncognito.com/oauth2/token—you get it fromcognito_oauth_endpoints.tokenTerraform output
- Client ID —401…st9— sensitive value you’ve printed out
— Client Secret —1j3…2nf— sensitive value you’ve printed out
— Scope — ex.system/*.*
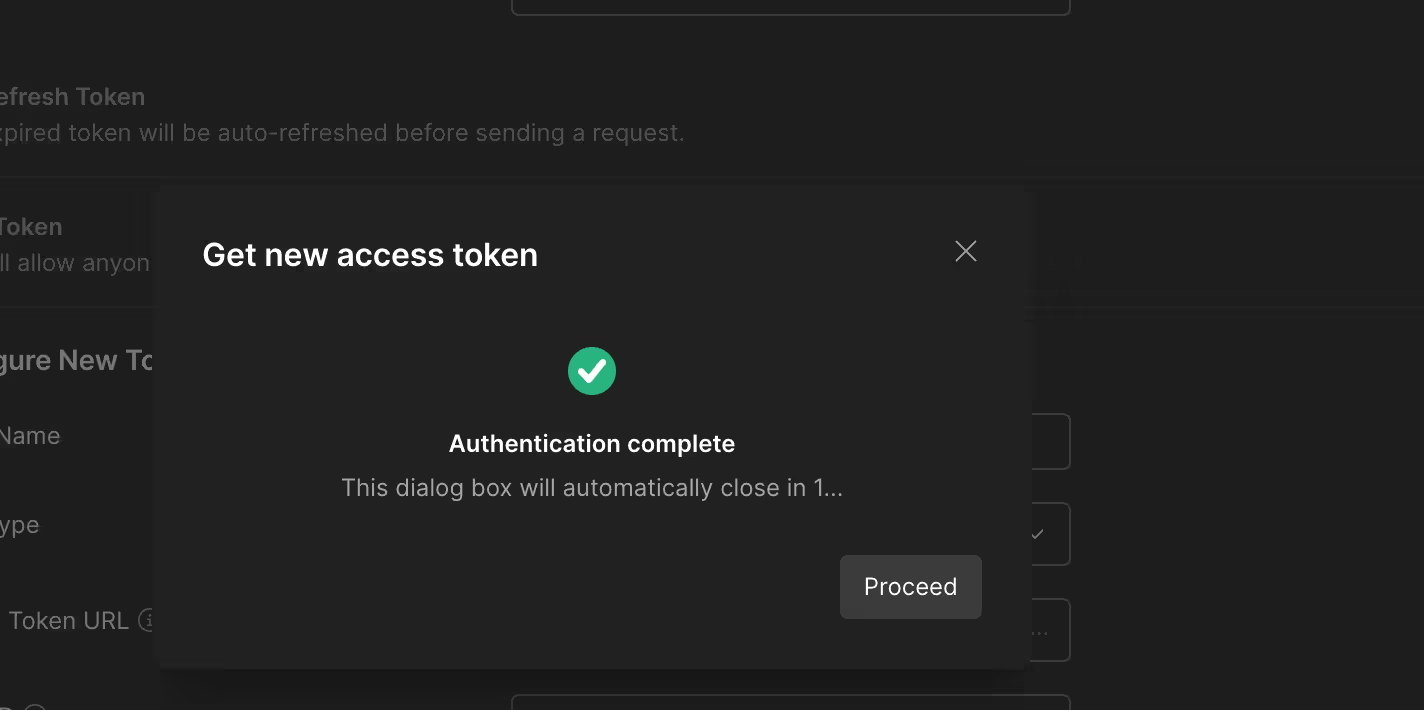
— State — ex.1231234 - Click “Get New Access Token button”
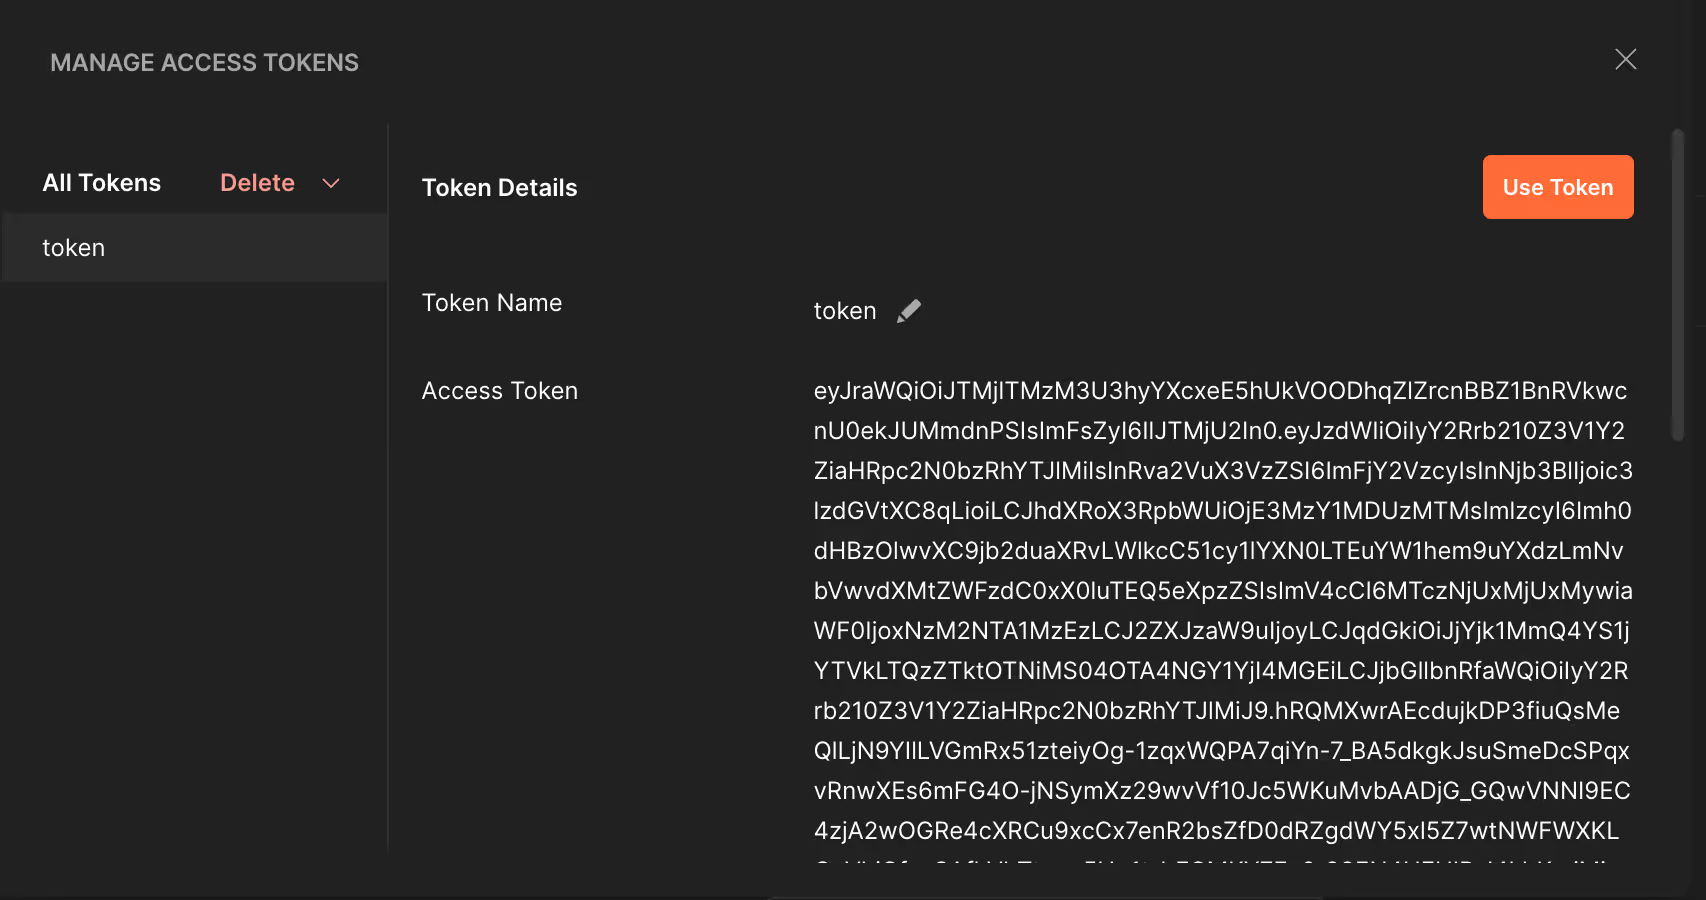
- You should get JWT token, click button to use it
- Make a a test request for instance
GEThttps://healthlake.us-east-1.amazonaws.com/datastore/<YOUR_DATASTORE_ID>/r4/Patient
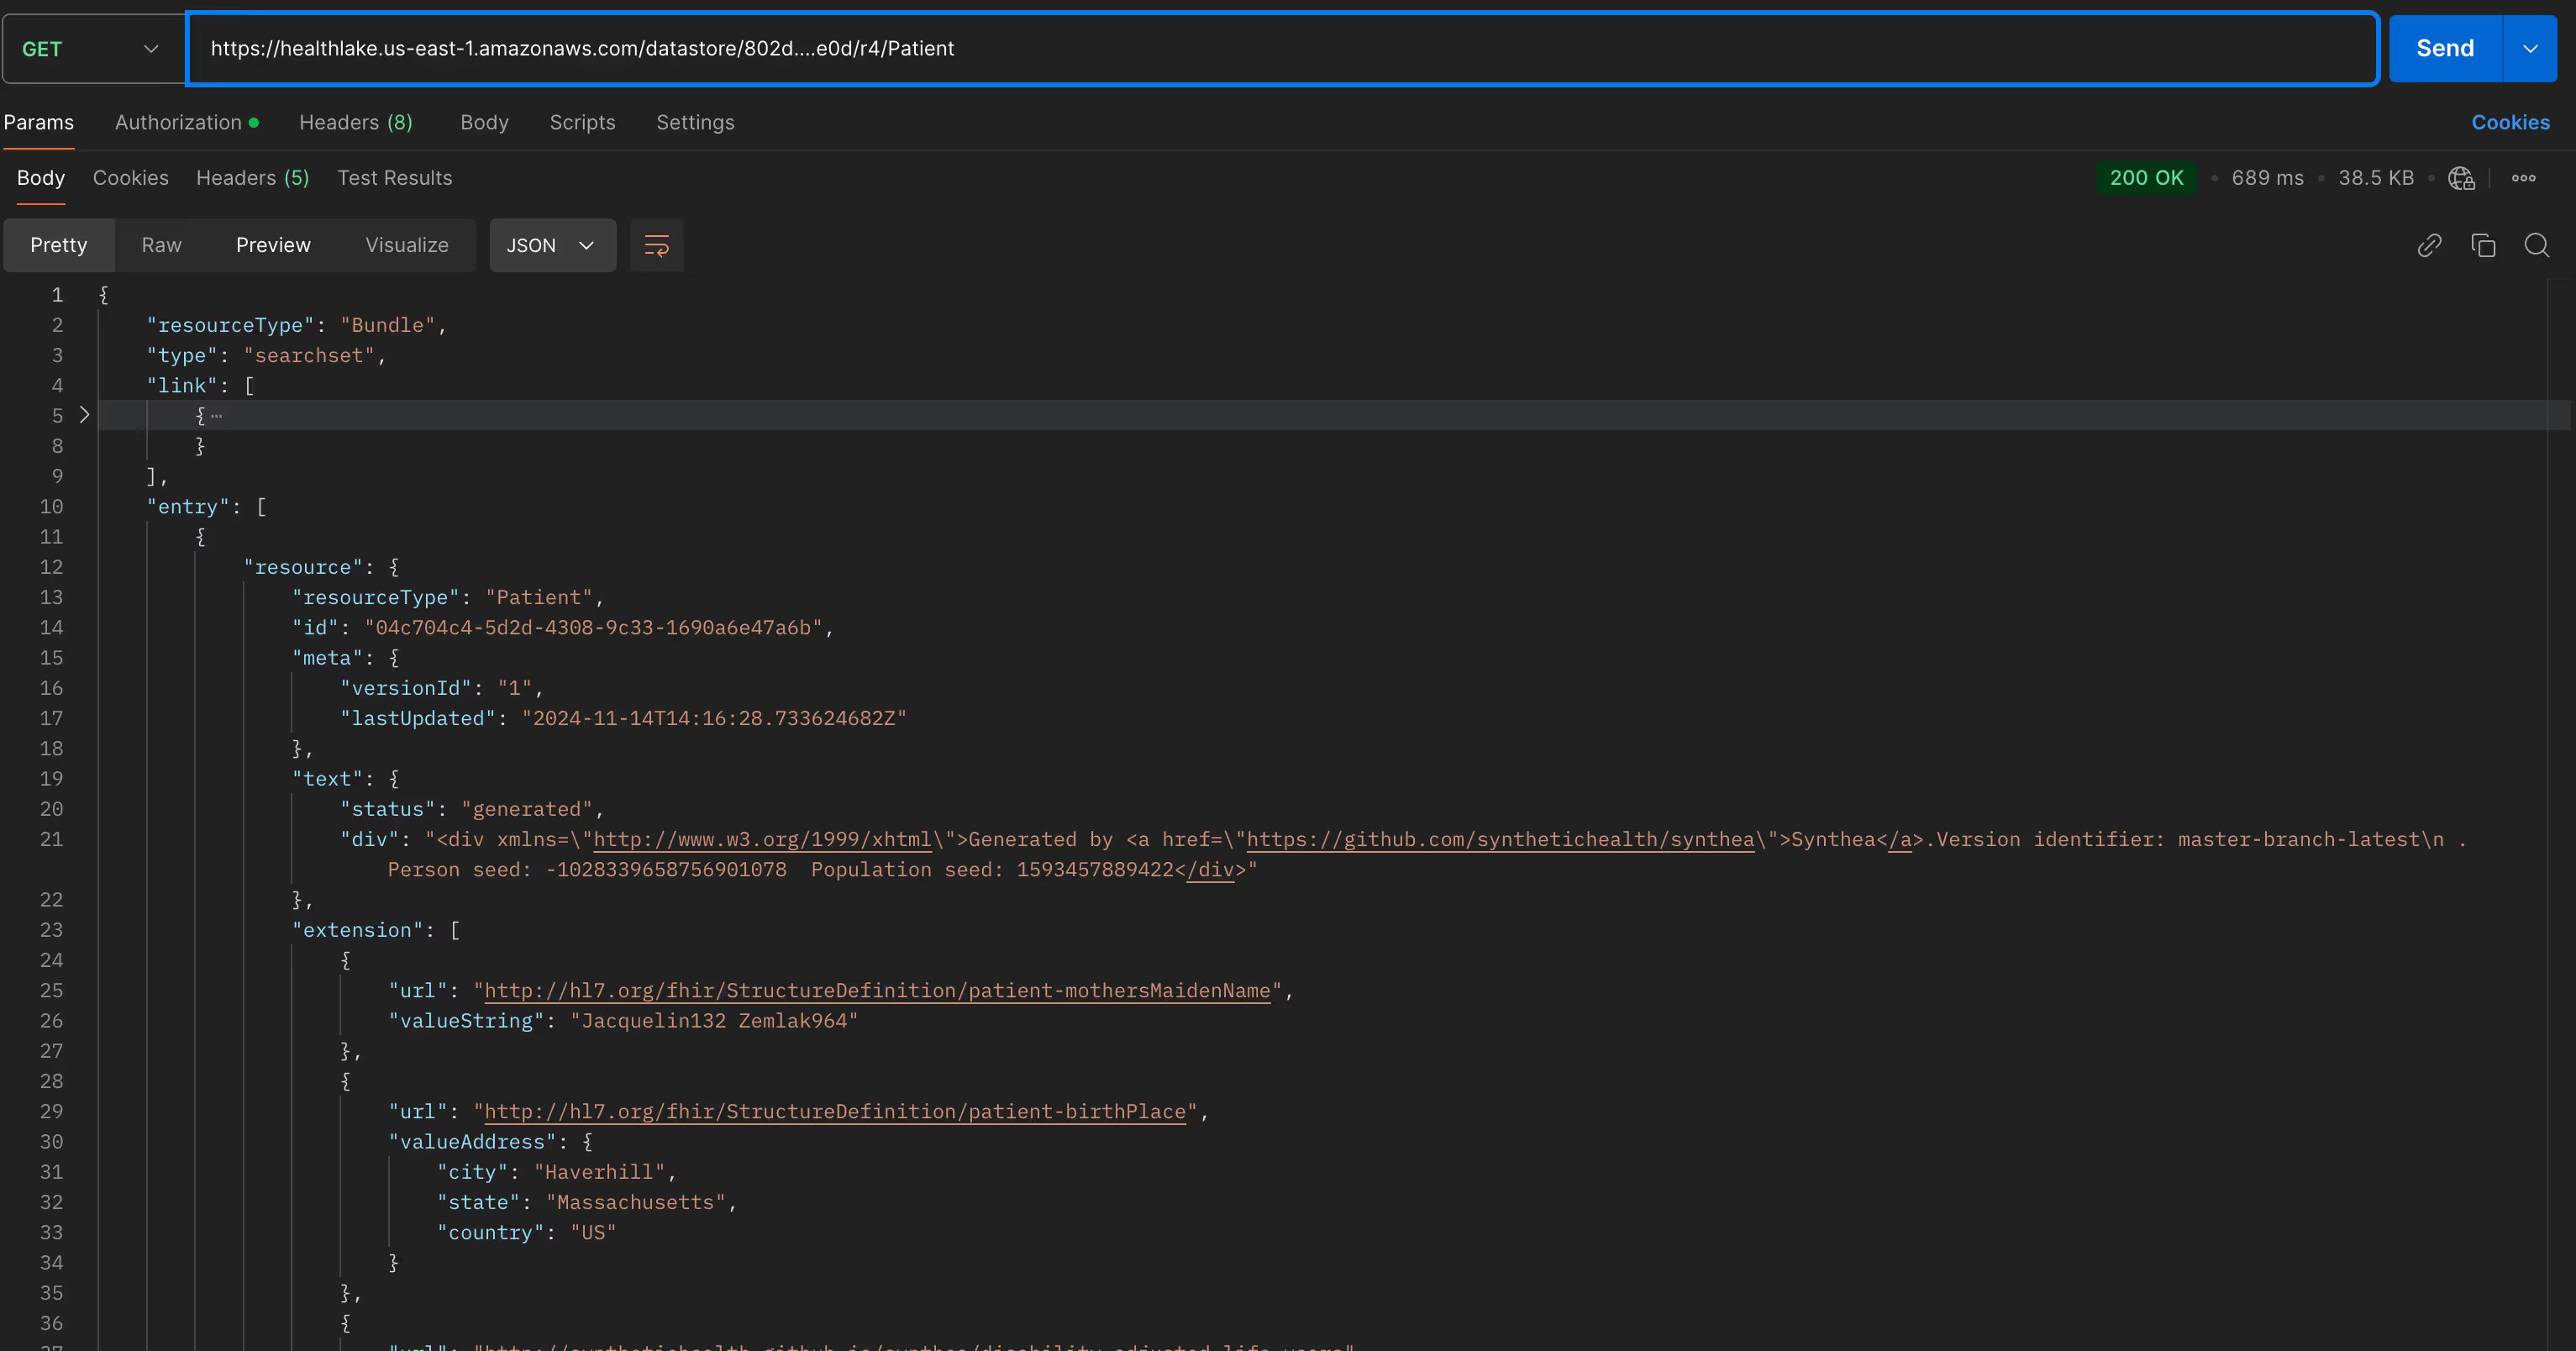
VSCode HTTP
I like to use VSCode REST Client extension and it is perfectly valid for testing authentication:
# Set your environment variables
@baseUrl = https://smart-fhir-test.auth.us-east-1.amazoncognito.com
@clientId = 401...st9
@clientSecret = 1j39...nf
@fhirEndpoint = https://healthlake.us-east-1.amazonaws.com/datastore/9c3...6b6/r4/

### Get Token using Client Credentials
# @name getToken
POST {{baseUrl}}/oauth2/token
Content-Type: application/x-www-form-urlencoded

grant_type=client_credentials
&scope=system/*.*
&client_id={{clientId}}
&client_secret={{clientSecret}}

### Test FHIR API with Token
@token = {{getToken.response.body.access_token}}

GET {{fhirEndpoint}}/Patient
Authorization: Bearer {{token}}
Summary
This guide walked through implementing SMART-on-FHIR authentication with AWS HealthLake using Terraform. We covered:
- Setting up AWS HealthLake with basic configuration and encryption
- Implementing authentication using AWS Cognito:
-Creating user pools for managing users
-Configuring resource servers for SMART-on-FHIR scopes
-Setting up client applications - Building a Lambda function for token validation and authentication, including:
-JWT token validation
-SMART-on-FHIR specific claim validation
-Error handling and security controls - Deploying the infrastructure with proper IAM roles and permissions
Full code is available in this Github Gist 🚀
For a ready-to-use implementation, check out the Momentum’s HealthStack repository.
Remember that AWS HealthLake deployment takes 20–30 minutes, so plan accordingly.
I hope this article helped you! By following this guide, you've equipped your healthcare application with a robust, standardized authentication mechanism, enhancing both security and interoperability.
So you're looking to elevate your healthcare solutions?
At Momentum, we specialize in integrating cutting-edge technologies to streamline healthcare operations and enhance patient outcomes. Whether you're implementing SMART on FHIR or exploring other innovative solutions, our team is here to guide you every step of the way.
Frequently Asked Questions
AWS FHIR refers to Amazon Web Services’ support for the FHIR (Fast Healthcare Interoperability Resources) standard, which enables healthcare systems and apps to securely exchange patient data in real-time. Services like AWS HealthLake provide scalable, FHIR-native storage and search capabilities that power modern healthcare applications. Momentum helps healthcare teams build secure AWS FHIR integrations using best practices for compliance and scalability.
FHIR works on AWS by enabling healthcare applications to store, query, and manage patient data using FHIR-compliant APIs. Amazon HealthLake simplifies FHIR adoption by providing fully managed data storage, indexing, and analytics capabilities. Momentum guides teams through practical FHIR implementations on AWS, automating cloud infrastructure with Terraform to ensure fast, secure deployments.
SMART on FHIR is a standards-based framework that allows healthcare apps to securely connect with Electronic Health Records (EHRs) using OAuth 2.0 and FHIR APIs. It ensures seamless, compliant, and scalable interoperability across healthcare systems. Momentum specializes in building SMART on FHIR apps that integrate securely with AWS FHIR services and support real-time, patient-centered care.
AWS HealthLake provides a fully managed, scalable solution for storing and querying healthcare data in FHIR format. It simplifies data interoperability and supports advanced analytics, machine learning, and real-time reporting. Momentum helps healthcare companies build SMART on FHIR apps on AWS HealthLake with robust security, Terraform-driven deployments, and seamless cloud integration.
Terraform enables infrastructure as code (IaC) for AWS cloud environments, allowing healthcare teams to automate, version-control, and scale their AWS FHIR and SMART on FHIR infrastructure quickly and reliably. Momentum uses Terraform to deploy AWS HealthLake, API Gateway, Amazon Cognito, and secure cloud resources in a repeatable, compliant way.
Yes, Terraform supports multi-region AWS FHIR deployments, ensuring high availability, disaster recovery, and system resilience across geographies. Momentum helps digital health teams configure scalable, secure, multi-region cloud infrastructure that supports SMART on FHIR applications worldwide.
Key AWS services for SMART on FHIR implementation include:
- AWS HealthLake for FHIR data storage and indexing
- Amazon Cognito for secure authentication
- Amazon API Gateway for managing API access
- AWS Lambda for serverless processing
Momentum integrates these AWS services using Terraform for seamless, secure, and automated deployments.
SMART on FHIR apps handle sensitive patient data, which requires HIPAA-compliant security, strict authentication, and encrypted data exchange. Momentum ensures all SMART on FHIR and AWS FHIR implementations meet rigorous healthcare security standards, using AWS-native services and DevOps best practices.
Startups and healthcare innovators can rapidly build FHIR-compliant, SMART on FHIR apps using AWS HealthLake and Terraform, reducing time-to-market while ensuring scalability and security. Momentum supports early-stage teams with tailored cloud strategies, Terraform automation, and healthtech-specific infrastructure expertise.
Momentum is a trusted digital health agency with proven experience in:
- SMART on FHIR app development
- AWS FHIR integration
- Terraform-based infrastructure automation
- Healthcare cloud security
We help healthtech companies build secure, scalable, and interoperable digital health solutions that comply with industry regulations and support real-world clinical workflows.


.png)


